Stroke Order
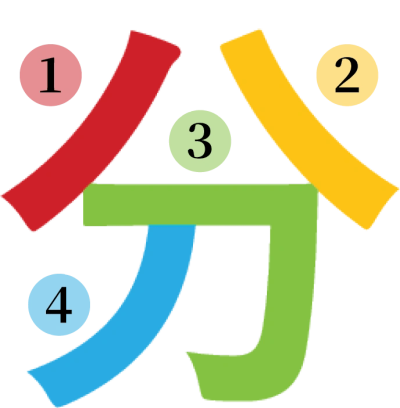
For easier discussion, please reference this diagram for the numbering of strokes in 分 (bu).
Triangle in Bu
Three Dots in Top Right
Ichi Crosses Border

Strokes 1, 2, and 3 in bu form a triangle on Shotoku ichibuban. While not published in major references, this is the easiest way to distinguish between Shotoku and Keicho ichibuban.
Ichi Crosses Border
Three Dots in Top Right
Ichi Crosses Border
Ichi fully crosses the dot border. This is common on Keicho ichibuban as well but is never seen on Kyoho ichibuban.
Three Dots in Top Right
Three Dots in Top Right
Three Dots in Top Right
There are always three dots in the top right corner. This is true of all Shotoku and Kyoho ichibuban and is common on Keicho ichibuban and should be used as an additional verification as opposed to a key identifier.
Shotoku-B1
Commentary
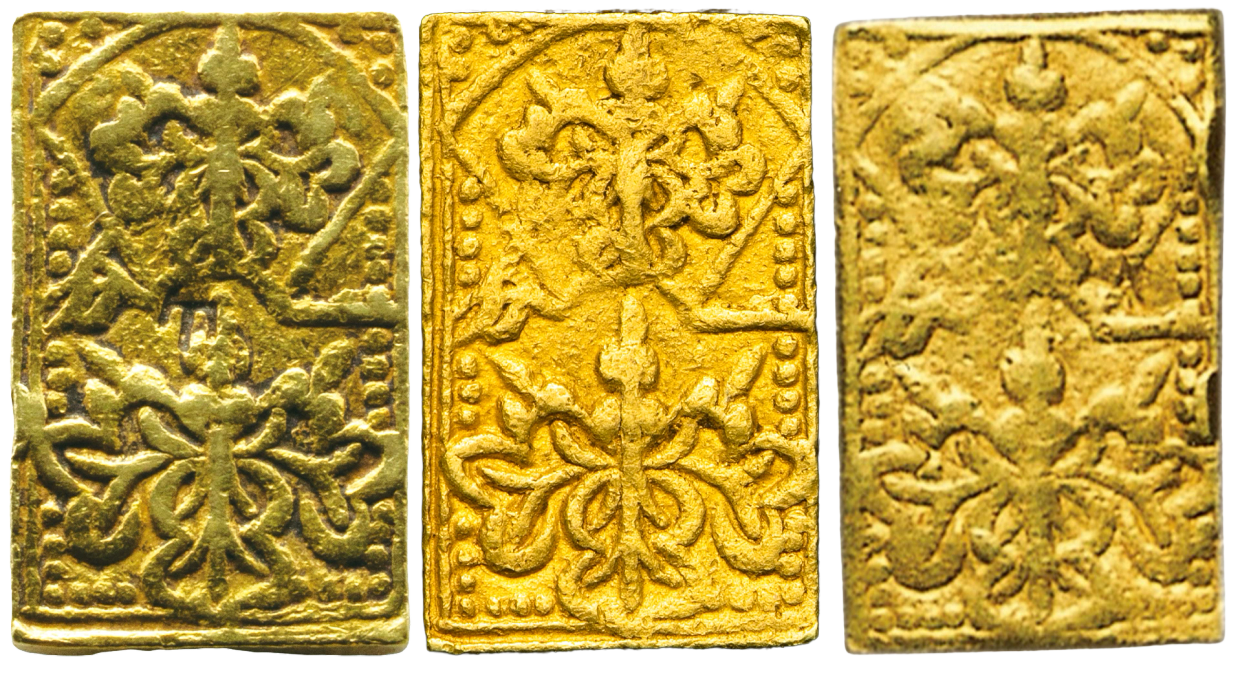
This die is one of the most immediately recognizable. All of the diagnostics listed below are fully unique to this die and are quite easy to spot.
Stats
B1 Diagnostics
No Dot Near Bu
Bottom Right: 4 Across, 4 Up
5 Dots Above Ichi
Where bu intersects the border there are no dots touching or close to touching the character.
5 Dots Above Ichi
Bottom Right: 4 Across, 4 Up
5 Dots Above Ichi
This is the only known die with five dots above ichi instead of four.
Bottom Right: 4 Across, 4 Up
Bottom Right: 4 Across, 4 Up
Bottom Right: 4 Across, 4 Up
The number of dots in the bottom corners will be used as a diagnostic for many dies. In the bottom right corner, B1 has four dots along the bottom and four dots going up the side.
Shotoku-B2
Commentary
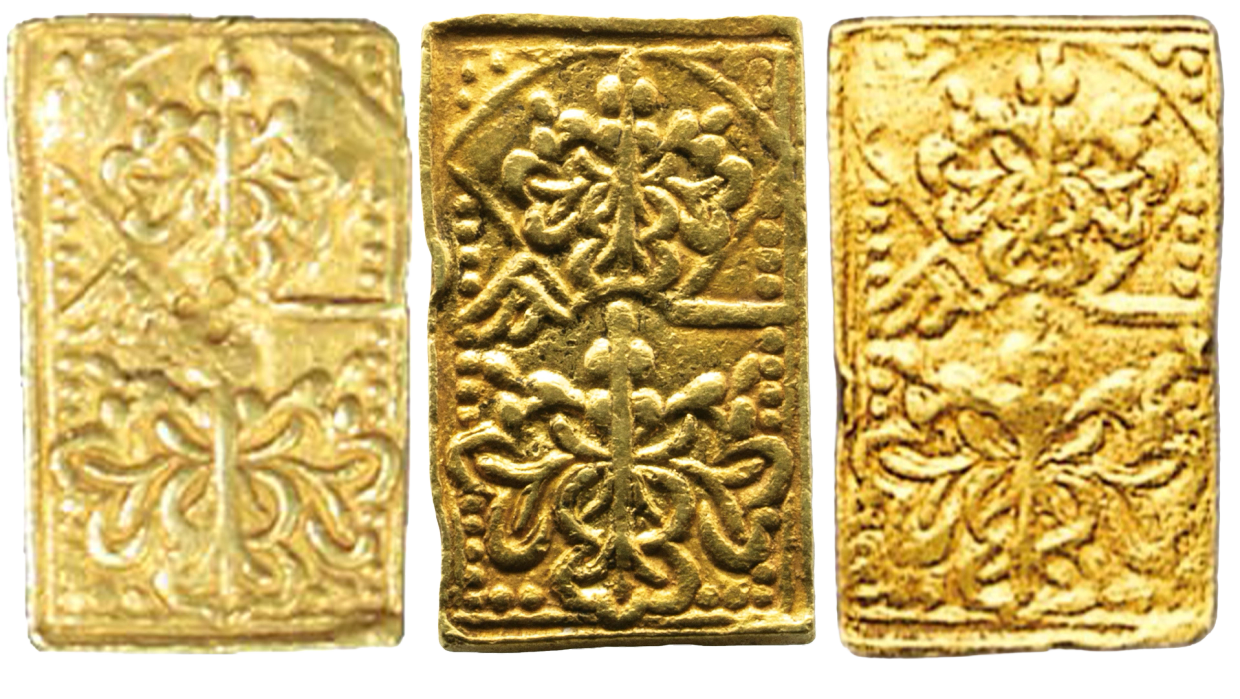
This die is easy to distinguish from most by the arrangement of dots in the bottom righthand corner, but it's extremely similar to Shotoku-B5. The diagnostics below have been selected primarily to help differentiate these two dies.
Stats
Total Found: 3/27 (11%)
Paired with:
- Shotoku-A1 (2/3)
- Shotoku-A2 (1/3)
Kirimon stamp present on 2 or 3 examples
B2 Diagnostics
Dot between Bu Strokes 1 and 4
Dot between Bu Strokes 1 and 4
Dot between Bu Strokes 1 and 4
Where bu intersects the border, there's a dot between strokes 1 and 4.
No Gap Beside Kirimon
Dot between Bu Strokes 1 and 4
Dot between Bu Strokes 1 and 4
On the righthand side, there's no gap between the kirimon bud and the dot border.
Bottom Left: 3 Across, 5 Up
Dot between Bu Strokes 1 and 4
Bottom Left: 3 Across, 5 Up
The bottom left corner has three dots along the bottom and five dots going up the side.
Shotoku-B3
Commentary
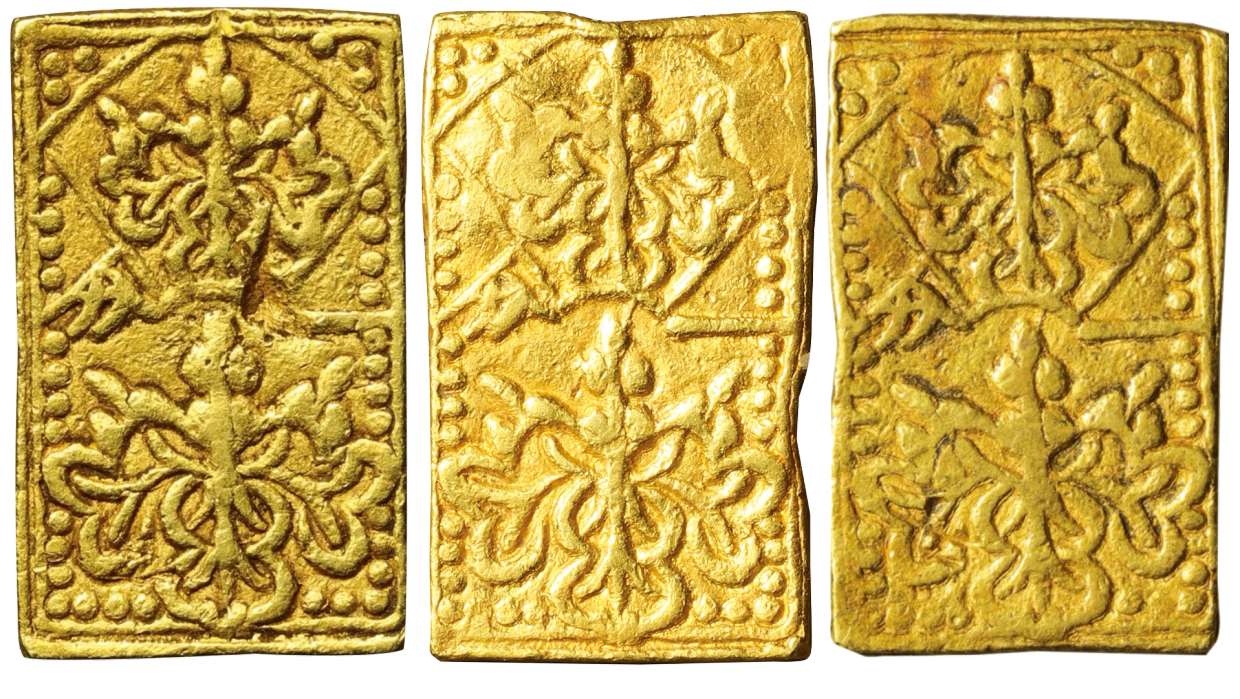
This is the most common B die currently observed, but not by a wide margin. It's also paired with five of the seven known A dies, more than any other B die as currently found.
Stats
Total Found: 9/27 (33%)
Paired with:
- Shotoku-A1 (1/9)
- Shotoku-A2 (1/9)
- Shotoku-A3 (4/9)
- Shotoku-A4 (2/9)
- Shotoku-A5 (1/9)
Kirimon stamp present on 4 or 5 examples
B3 Diagnostics
Top Right Dots Curved
Bottom Right: 3 Across, 4 Up
Ichi Narrows at Border
The dots in the top right corner are somewhat curved around the corner; they don't form a clear right angle.
Ichi Narrows at Border
Bottom Right: 3 Across, 4 Up
Ichi Narrows at Border
Ichi is generally fairly narrow on this die, but also seems to narrow as it crosses the dot border. It's almost touching a dot below, but there's a clear space between it and the dot above.
Bottom Right: 3 Across, 4 Up
Bottom Right: 3 Across, 4 Up
Bottom Right: 3 Across, 4 Up
The bottom right has three dots along the bottom and four dots going up the side.
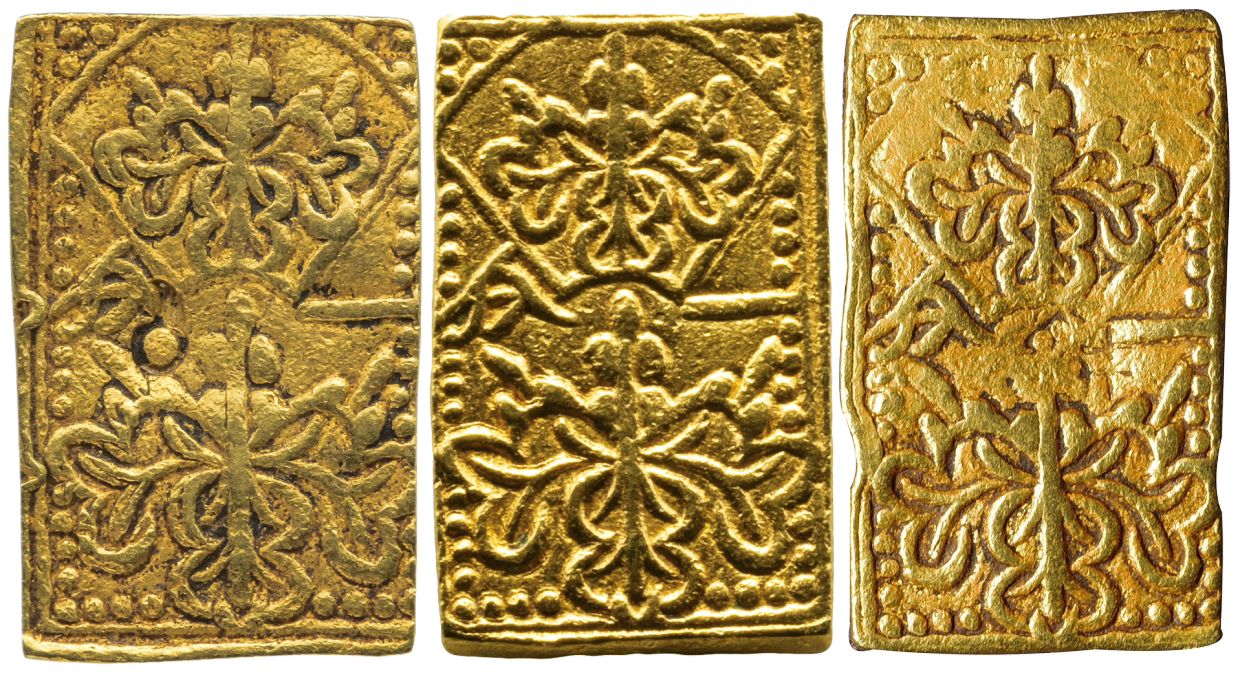
Shotoku-B4
Commentary
The style of bu on this die is unusual and makes it pretty easy to identify.
Stats
Total Found: 7/27 (26%)
Paired with:
- Shotoku-A2 (4/7)
- Shotoku-A3 (1/7)
- Shotoku-A5 (1/7)
- Shotoku-A6 (1/7)
Kirimon stamp present on 5 or 6 examples
B4 Diagnostics
Unusual Bu Style
Bottom Right: 4 Across, 3 Up
Unusual Bu Style
The right end of stroke 2 in bu is closer to the center than on other dies, with the end clearly past the bottom left corner of the kirimon frame above. Also note that strokes 3 and 4 are not parallel and are closer together at the bottom than the top.
Misaligned Dots
Bottom Right: 4 Across, 3 Up
Unusual Bu Style
The dots below ichi are not in a straight line. The third dot down is noticeably out of line.
Bottom Right: 4 Across, 3 Up
Bottom Right: 4 Across, 3 Up
Bottom Right: 4 Across, 3 Up
The bottom right has four dots along the bottom and three dots going up the side.
Shotoku-B5
Commentary
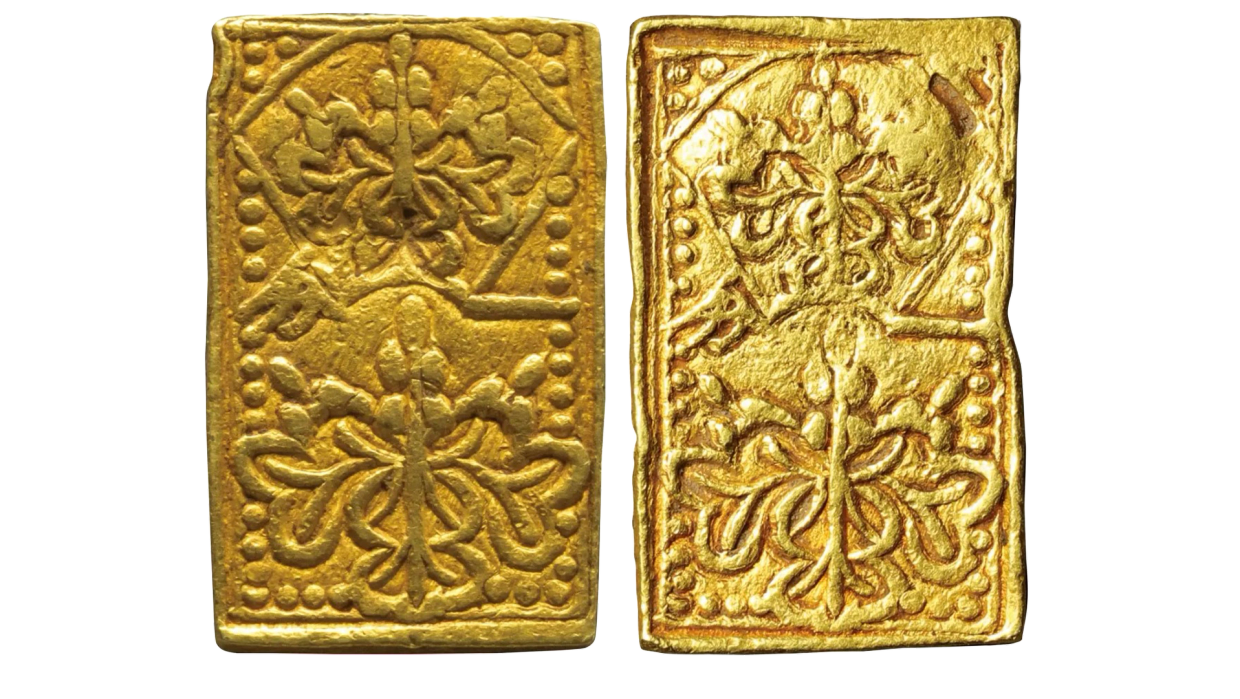
This die is easily distinguished from most others by the arrangement of dots in the bottom right corner, but is extremely similar to Shotoku-B2. As was the case for B2, the diagnostics below have been chosen to help separate these two dies. To rule out any other die, you only need to look at the bottom right corner. This is also the only B die that is not tied to the rest of the mintage with die links, which is discussed on the main die study page.
Stats
B5 Diagnostics
Dot at End of Bu Stroke 4
Dot at End of Bu Stroke 4
Dot at End of Bu Stroke 4
The end of stroke 4 collides directly with a dot in the border.
Dot Collides with Kirimon
Dot at End of Bu Stroke 4
Dot at End of Bu Stroke 4
On the top right side of the bottom kirimon, a dot collides with the kirimon outline.
Bottom Corners
Dot at End of Bu Stroke 4
Bottom Corners
The bottom left corner has 4 dots across the bottom and 4 dots up the side, while the bottom right corner has three dots across the bottom and 2 dots up the side, with a third separated by the kirimon. Other dies can have one of these arrangements, but no other dies share both counts.